20. Components » BGP Connector
Wanguard sends and withdraws BGP announcements (advertisements, routing updates) in the following cases:
■ To protect the network by announcing DDoS’ed destinations to the upstream provider(s) using a special BGP community. In less than a second, the undesirable traffic is dropped before it enters the protected network because the BGP peeers are no longer routing the attacked addresses, making them effectively null-routed. This network protection technique is called RTBH (Remote Triggered Black Hole), blackhole routing or null-routing■ To re-route attacked destinations through servers running Wanguard Filter, which analyzes the traffic, rejects the bad packets, and re-injects the cleaned traffic back into the network. This network protection technique is called traffic scrubbing, side filtering, sinkhole routing, or clean pipe■ To leverage BGP Flowspec for mitigation and/or traffic diversion. Flowspec enables mitigation directly on the edge router and offers a much more granular mechanism for matching traffic. A few of the match fields supported by BGP Flowspec: Destination Address, Source Address, IP Protocol, Source Port, Destination Port, ICMP Code, TCP Flags■ To announce the attacking IP in BGP when S/RTBH is available■ Console users can null-route traffic manually, e.g., to block access to a specific IP address for legal reasons■ Console users can divert traffic manually, e.g., to inspect packets for troubleshooting purposes
The following backends do the communication with the BGP-enabled routers:
■ ExaBGP is a tool typically used outside the data plane to do path manipulation on a BGP network that may be composed of closed-source components. ExaBGP supports newer technologies such as BGP Flowspec
To add a BGP Connector, click the [+] button from the title bar of the Configuration » Components panel. To modify an existing BGP Connector, go to Configuration » Components and click its name.
20.1. ExaBGP Connector
Before you add an ExaBGP Connector, you must have a previously-configured, fully-functional exabgpd. If you do not, jump to the ExaBGP installation section. You can have a single exabgp and many ExaBGP Connectors using it, which is useful if you need to send announcements with different parameters, e.g., when using multiple communities.
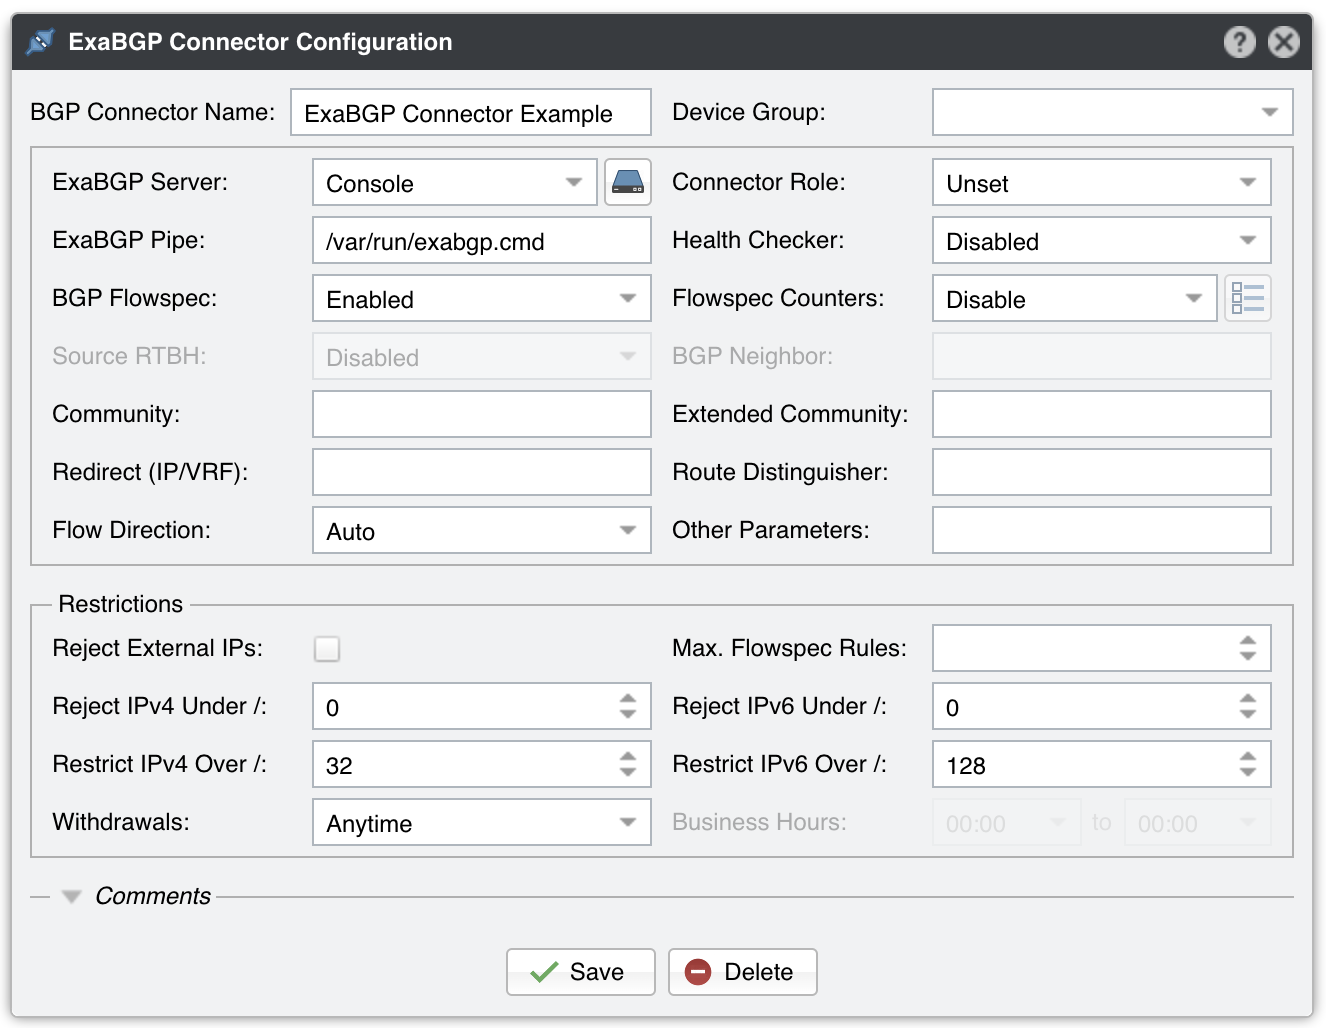
ExaBGP Connector Configuration parameters:
● BGP Connector Name – A short name or description for the ExaBGP Connector● Device Group – Optional description to group up components (e.g., by location or role). You can use it to restrict the access of Guest accounts● ExaBGP Server – Select a server that runs ExaBGP● Connector Role – Setting the correct role influences the Actions shown in the New Flowspec Rule window and the priority given when there are overlapping announcements by different BGP Connectors with different roles. Prevents mitigation announcements being overwritten by similar diversion announcements• Mitigation – Select if the Connector is used for null-routing or traffic filtering• Diversion – Select if the Connector is used for traffic diversion● ExaBGP Pipe – Mandatory path to the pipe file used to control exabgp. The file must be writeable by the “andrisoft” system account● Health Checker – When enabled, the existence of the ExaBGP Pipe file is checked on every minute. If the file doesn’t exist, a warning is written in the event log. The status of the BGP peers is checked too, and when a BGP peer is down, another warning is written in the event log. You can view the status of the BGP peers in Reports » Devices » Overview. This functionality needs a working “exabgpcli show neighbor summary” command● BGP Flowspec – Enable if the router supports BGP Flowspec. If the router doesn’t support Flowspec, consider using a Quagga Connector instead● Flowspec Counters – Because there is no vendor-neutral standard for reporting information about the packets and bytes dropped by Flowspec rules, this functionality is limited to a single option:• Juniper MX – Wanguard connects by SSH to a Juniper MX router using the credentials entered when clicking the options button from the right. Every few seconds, the command “show firewall filter __flowspec_default_inet__” is executed on the router. The output is parsed, and the counters are matched with the known rules● Source RTBH – Enable if the BGP Connector is used for S/RTBH. It should not be confused with the much more popular Destination RTBH. Very few networks support this functionality● BGP Neighbor – Optional parameter used to distinguish between BGP neighbors● Community – BGP community or list of BGP communities to be appended to each announcement. Not mandatory● Extended Community – BGP extended community or list of BGP extended communities to be appended to each announcement. Not mandatory● Redirect (IP/VRF) – Optional parameter for diversion. Can be an IP, VRF, or “self”● Route Distinguisher – An optional rd value to be passed with each announcement● Flow Direction – Switches the source IP with the destination IP in each announcement. Set to “Inverted” only when doing symmetric routing● Other Parameters – Other parameters that will be passed with each announcement, such as local-preference or as-path, in exabgp.conf’s format, separated by a semicolon● Reject External IPs – When checked, it permits only announcements for the prefixes defined in an IP Zone● Max. Flowspec Rules – The number of Flowspec rules accepted by each router is limited, so you may have to enter the limit here to prevent overflowing the Flowspec table size. Limits published by vendors: Alcatel-Lucent 512, Cisco (ASR9k) 3000, Juniper 8000● Reject IPv4 under / – Restricts sending prefixes that have the IPv4 CIDR mask less than the configured value. For example, a value of 32 rejects all prefixes that are not hosts and prevents manual or automatic announcements of subnets. To disable this feature enter the value 0● Reject IPv6 under / – Restricts sending prefixes that have the IPv6 CIDR mask less than the configured value. For example, a value of 128 rejects all prefixes that are not hosts and prevents manual or automatic announcements of subnets. To disable this feature enter the value 0● Restrict IPv4 over / – Set to the maximum IPv4 CIDR mask accepted by your cloud-based DDoS mitigation providers. For example, if your BGP peers accept only /24 prefixes, and you want to announce a whole C class for a single attacked IP, set to 24. To disable this feature enter the value 32● Restrict IPv6 over / – Set to the maximum IPv6 CIDR mask accepted by your cloud-based DDoS mitigation providers. To disable this feature enter the value 128● Withdrawals – The withdrawal of announcements can be delayed until the time interval specified in the Business Hours field has passed● Comments – Comments about the ExaBGP Connector can be saved here. These observations are not visible elsewhere
To enable the ExaBGP Connector, click the small on/off switch button displayed next to its name in Configuration » Components.
After the ExaBGP Connector is enabled, it can be used by Wanguard Sensor and Wanguard Filter when a Response activates it. To mitigate attacks automatically using Flowspec, configure a Wanguard Filter, and add the “Announce a BGP routing update with Flowspec or S/RTBH” action from the “When a filtering rule is detected” panel of the Response.
Wanguard Console users can send Flowspec announcements via the ExaBGP Connector in Reports » Tools » Routing » [Add Flowspec Rule]. Console users can also use the REST API to send Flowspec announcements from any scripting language.
All BGP routing updates are logged in Reports » Tools » Routing » BGP Announcement Archive. If you encounter errors, check the BGP Connector Troubleshooting steps.
20.1.1. ExaBGP Installation
Wanguard connects to exabgpd using the ExaBGP Connector described in the previous section. The configuration of exabgp.conf exceeds the scope of this documentation. In the Network Integration Guideline chapter, you can find some information about various deployment scenarios and the configuration needed on the routers.
ExaBGP 4.0 and ExaBGP 4.2 have different installation steps:
On distributions running python 3.8, such as Ubuntu 20, install the wanbgp package and exabgp from the master git branch. For other distributions, install ExaBGP 4.2 from pip and not from the distribution’s repository.
[root@localhost ~]# apt install wanbgp python3-pip # on Debian/Ubuntu
[root@localhost ~]# yum install wanbgp python3-pip # on CentOS/Red Hat
[root@localhost ~]# pip3 install exabgp
Create the named pipe:
[root@localhost ~]# exabgp --fi > /usr/local/etc/exabgp.env
[root@localhost ~]# mkdir /run/exabgp
[root@localhost ~]# chown nobody /run/exabgp
[root@localhost ~]# mkfifo /run/exabgp/exabgp.{in,out}
[root@localhost ~]# chown nobody /run/exabgp/exabgp.{in,out}
[root@localhost ~]# chmod 660 /run/exabgp/exabgp.{in,out}
Assuming that the exabgp configuration file is /etc/exabgp.conf, start it in daemon mode with a command such as:
env exabgp.log.destination=syslog exabgp.daemon.daemonize=true exabgp /etc/exabgp.conf
Enter /run/exabgp/exabgp.in in the ExaBGP Pipe field from the ExaBGP Connector.
On Debian / Ubuntu systems, install ExaBGP 4.0 from git, and then install the wanbgp and socat packages by executing:
[root@localhost ~]# apt-get install wanbgp socat
On Red Hat / CentOS systems, install ExaBGP 4.0 from git, and then install the wanbgp and socat packages by executing:
[root@localhost ~]# yum install wanbgp socat
The “process” and “api” sections from the configuration file listed below are mandatory. The rest of the lines are given as an example.
process announce-routes {
     run /usr/bin/socat stdout pipe:/var/run/exabgp.cmd;
     encoder json;
}

neighbor 192.168.50.1 {
     # ID for this ExaBGP router
     router-id 192.168.50.2;
     local-address 192.168.50.2;
     # local AS number
     local-as 65001;
     # remote AS number
     peer-as 12345;
     group-updates false;

     family {
             ipv4 flow;
     }
     api {
             processes [ announce-routes ];
     }
}
Start ExaBGP 4.0 with a command such as:
env exabgp.daemon.user=root exabgp.daemon.daemonize=true exabgp.daemon.pid=/var/run/exabgp.pid exabgp.log.destination=/var/log/exabgp.log /opt/exabgp4/sbin/exabgp /etc/exabgp_example.conf
Verify that ExaBGP 4.0 starts and functions correctly by inspecting /var/log/exabgp.log.
20.2. Quagga Connector
Before you add a Quagga Connector, you must have a previously-configured, fully-functional bgpd. If you do not, jump to the Quagga / FRR installation section. You can have a single bgpd and many Quagga Connectors using it, which is helpful if you need to send announcements with different parameters, e.g., when using multiple route-maps to send different communities.
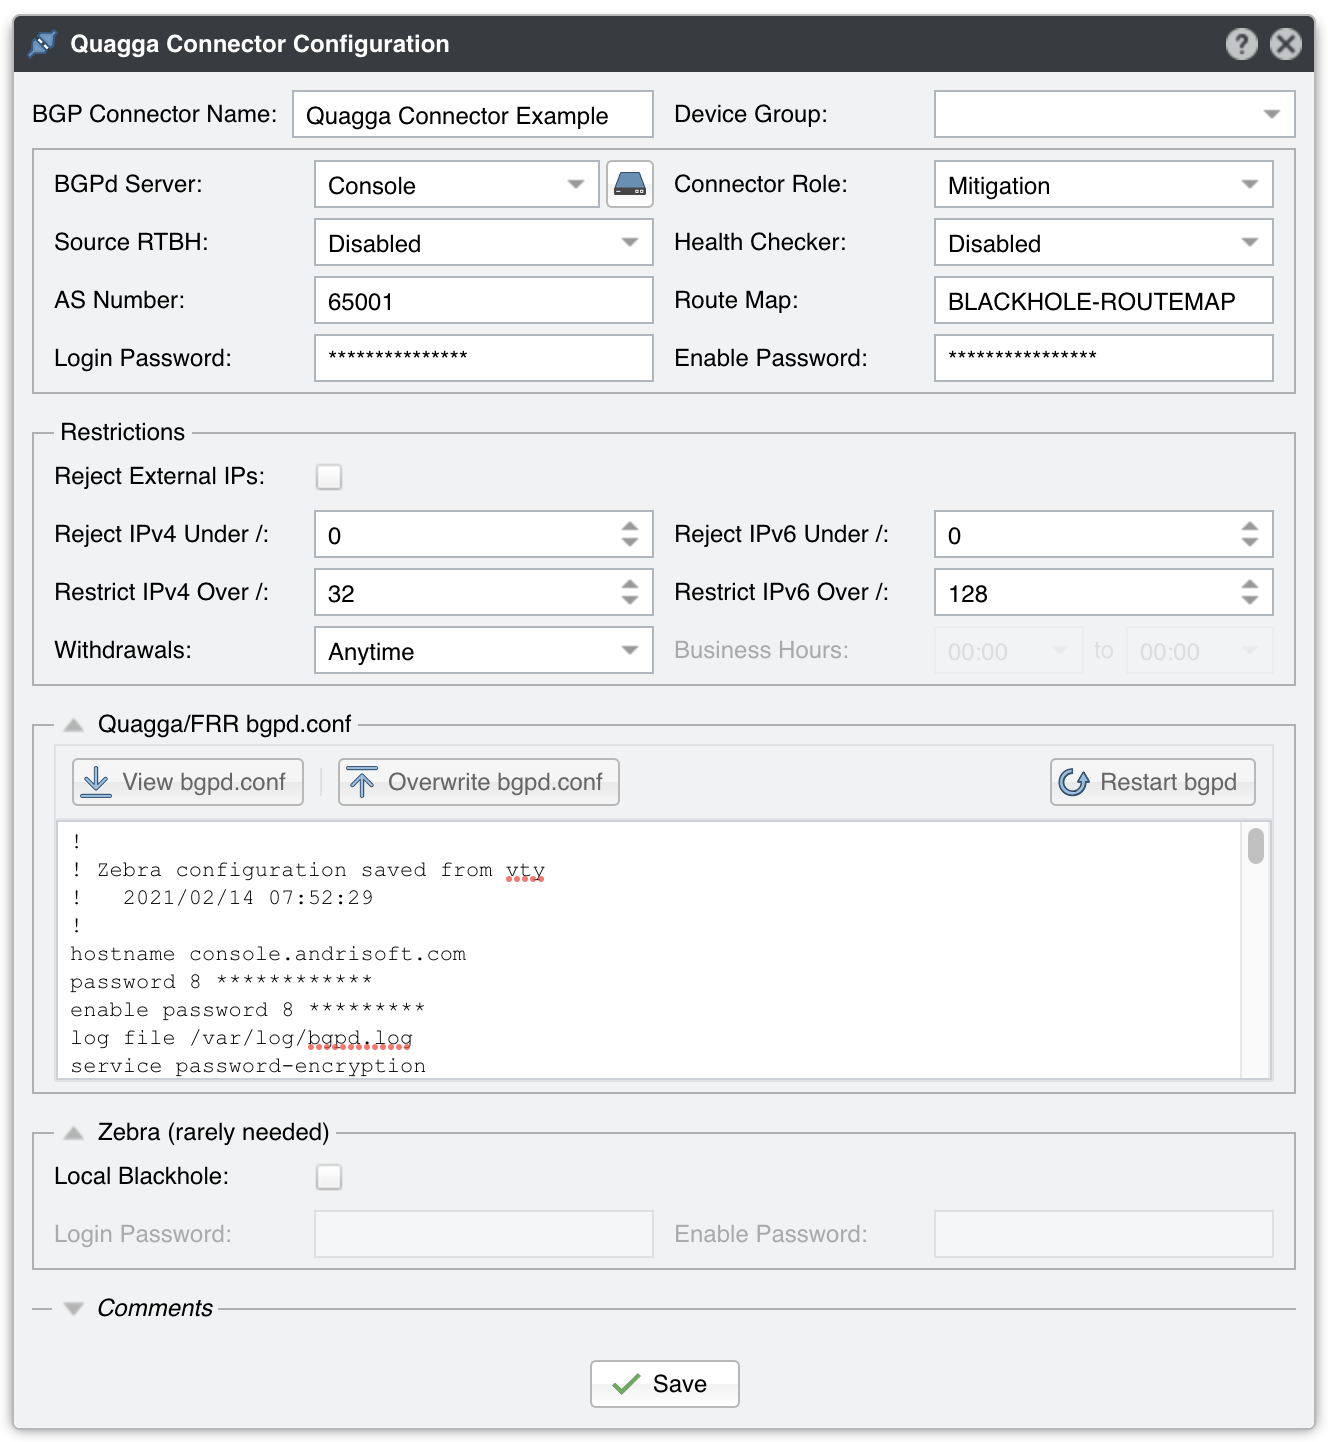
Quagga Connector Configuration parameters:
● BGP Connector Name – A short name or description of the Quagga Connector● Device Group – Optional description used to group up components (e.g., by location or role). You can use it to restrict the access of Guest accounts● Connector Role – Setting the correct role influences the Actions shown in Reports » Tools » Routing and the priority given when there are overlapping announcements by different BGP Connectors with different roles. Prevents mitigation announcements being overwritten by similar diversion announcements• Mitigation – Select if the Connector is used for null-routing or traffic filtering• Diversion – Select if the Connector is used for traffic diversion● Source RTBH – Enable if the BGP Connector is used for S/RTBH. Do not confuse it with the much more popular Destination RTBH. Very few networks support this functionality● Health Checker – When enabled, the status of the BGP peers is checked on every minute. When a BGP peer is down, a warning is written in the event log. You can view the status of the BGP peers in Reports » Devices » Overview● AS Number – Enter the same AS number used in the bgpd configuration● Route Map – A route-map that will be used for each announcement. This option is not mandatory but widely used to append communities to the routing update● AS View – If multiple AS views are defined in the bgpd configuration, enter the AS view you want to use for this Quagga Connector. This option is not mandatory and rarely used● Login Password – Password needed to connect to the bgpd daemon● Enable Password – Configuration mode password of the bgpd daemon● Reject External IPs – When checked, it permits only announcements for the prefixes defined in an IP Zone● Reject IPv4 under / – Restricts sending prefixes that have the IPv4 CIDR mask less than the configured value. For example, a value of 32 rejects all prefixes that are not hosts and prevents manual or automatic announcements of subnets. To disable this feature enter the value 0● Reject IPv6 under / – Restricts sending prefixes that have the IPv6 CIDR mask less than the configured value. For example, a value of 128 rejects all prefixes that are not hosts and prevents manual or automatic announcements of subnets. To disable this feature enter the value 0● Restrict IPv4 over / – Set to the maximum IPv4 CIDR mask accepted by your cloud-based DDoS mitigation providers. For example, if your BGP peers accept only /24 prefixes, and you want to announce a whole C class for a single attacked IP, set to 24. To disable this feature enter the value 32● Restrict IPv6 over / – Set to the maximum IPv6 CIDR mask accepted by your cloud-based DDoS mitigation providers. To disable this feature enter the value 128● Quagga/FRR bgpd.conf – The content of the bgpd.conf file can be viewed and changed from the CLI or from the user interface. The file’s location is determined by the Sensor Distribution parameter from Configuration » Servers (by default, the path to bgpd.conf is /etc/quagga, except for CentOS 8 which uses /etc/frr). If you replace Quagga with FRR on other distributions, either edit the file from CLI or set Sensor Distribution to CentOS 8. The bgpd.conf file uses a format very similar to the Cisco IOS configuration format. Quagga’s documentation covers the configuration options● Zebra Local Black Hole – Check if you need the local black hole feature provided by the Zebra daemon. This rarely-used feature is useful only for inline servers● Zebra Login & Enable Password – Credentials required to connect to the zebra daemon● Comments – Comments about the Quagga Connector can be saved here. These observations are not visible elsewhere
To enable the Quagga Connector, click the small on/off switch button displayed next to its name in Configuration » Components.
After the Quagga Connector is enabled, it can be used by Wanguard Sensor when a Response activates it.
Wanguard Console users can send black hole or diversion announcements via the Quagga Connector in Reports » Tools » Routing » [Create Blackhole] or [Divert Traffic]. Console users can also use the REST API to send BGP announcements from any scripting language.
20.2.1. Quagga / FRR Installation
Wanguard sends and withdraws BGP announcements via the bgpd daemon provided by Quagga and FRR. The installation instructions are distribution-specific:
Install FRR, then edit /etc/frr/daemons. Change bgpd=no to bgpd=yes and remove the string “-A 127.0.0.1” from the bgpd_options line
[root@localhost ~]# apt install frr
[root@localhost ~]# nano /etc/frr/daemons
To be able to start the bgpd service, create a basic configuration file. Setting a password for the bgpd daemon is usually enough to get it started. Replace “bgppass” with your own password.
[root@localhost ~]# echo 'password bgppass' > /etc/frr/bgpd.conf
[root@localhost ~]# echo 'enable password bgppass' >> /etc/frr/bgpd.conf
[root@localhost ~]# chown frr /etc/frr/bgpd.conf
[root@localhost ~]# ln -s /etc/frr/bgpd.conf /etc/frr/frr.conf
[root@localhost ~]# systemctl enable frr
[root@localhost ~]# systemctl restart frr
Connect to the bgp daemon with telnet on localhost port 2605 (default bgpd port) and enter the previously-defined password (“bgppass”) when requested.
[root@localhost ~]# telnet 127.0.0.1 2605
localhost> enable
localhost# config terminal
localhost(config)#
Configure bgpd using the commands shown in the following example after adapting them to your own network. Please note that you can use the prefix-list, route-map, or distribute-list method for filtering outgoing routing information. To have a uniform approach, the following example uses route-maps. Optionally, BGP authentication can be configured to increase security and avoid any illegal BGP announcement which may lead to a security breach.
localhost(config)# router bgp <Wanguard-Filter-AS-number>
localhost(config-router)# bgp router-id <Wanguard-Filter-IP-address>
localhost(config-router)# neighbor <Router-IP-address> remote-as <Router-AS-number>
localhost(config-router)# neighbor <Router-IP-address> description <description>
localhost(config-router)# neighbor <Router-IP-address> password <BGP MD5 password>
localhost(config-router)# neighbor <Router-IP-address> route-map Wanguard-Filter-in in
localhost(config-router)# neighbor <Router-IP-address> route-map Wanguard-Filter-out out
localhost(config-router)# no bgp network import-check
localhost(config-router)# exit
localhost(config)# route-map Wanguard-Filter-in deny 10
localhost(config-route-map)# exit
localhost(config)# route-map Wanguard-Filter-out permit 10
localhost(config-route-map)# set community no-advertise <Wanguard-Filter-community>
localhost(config-route-map)# exit
localhost(config)# write
localhost(config)# exit
To display the bgpd configuration, enter the show running-config command from the “enable” command level. In the following example, the router’s AS number is 1000, and the BGPd AS number is 65000.
The following partial sample output is displayed:
localhost# show running-config
... skipped ...
router bgp 65000
bgp router-id 192.168.1.100
no bgp network import-check
neighbor 192.168.1.1 remote-as 1000
neighbor 192.168.1.1 description divert-from router
neighbor 192.168.1.1 soft-reconfiguration inbound
neighbor 192.168.1.1 route-map Wanguard-Filter-in in
neighbor 192.168.1.1 route-map Wanguard-Filter-out out
!
route-map Wanguard-Filter-in deny 10
!
route-map Wanguard-Filter-out permit 10
set community no-advertise
!
line vty
... skipped ...
Install Quagga, then remove the loopback binding (” -A 127.0.0.1”) from the /lib/systemd/system/bgpd.service file.
[root@localhost ~]# apt install quagga
[root@localhost ~]# nano /lib/systemd/system/bgpd.service
[root@localhost ~]# systemctl daemon-reload
To be able to start the bgpd service, create a basic configuration file. Setting a password for the bgpd daemon is usually enough to get it started. Replace “bgppass” with your own password. On these systems, bgpd starts only when zebra is running.
[root@localhost ~]# echo 'password bgppass' > /etc/quagga/bgpd.conf
[root@localhost ~]# echo 'enable password bgppass' >> /etc/quagga/bgpd.conf
[root@localhost ~]# chown quagga /etc/quagga/bgpd.conf
[root@localhost ~]# touch /etc/quagga/zebra.conf
[root@localhost ~]# systemctl start zebra
[root@localhost ~]# systemctl enable zebra
[root@localhost ~]# systemctl start bgpd
[root@localhost ~]# systemctl enable bgpd
Connect to the bgp daemon with telnet on localhost port 2605 (default bgpd port) and enter the previously-defined password (“bgppass”) when requested.
[root@localhost ~]# telnet 127.0.0.1 2605
localhost> enable
localhost# config terminal
localhost(config)#
Configure bgpd using the commands shown in the following example after adapting them to your own network. Please note that you can use the prefix-list, route-map, or distribute-list method for filtering outgoing routing information. To have a uniform approach, the following example uses route-maps. Optionally, BGP authentication can be configured to increase security and avoid any illegal BGP announcement which may lead to a security breach.
localhost(config)# router bgp <Wanguard-Filter-AS-number>
localhost(config-router)# bgp router-id <Wanguard-Filter-IP-address>
localhost(config-router)# neighbor <Router-IP-address> remote-as <Router-AS-number>
localhost(config-router)# neighbor <Router-IP-address> description <description>
localhost(config-router)# neighbor <Router-IP-address> password <BGP MD5 password>
localhost(config-router)# neighbor <Router-IP-address> route-map Wanguard-Filter-in in
localhost(config-router)# neighbor <Router-IP-address> route-map Wanguard-Filter-out out
localhost(config-router)# exit
localhost(config)# route-map Wanguard-Filter-in deny 10
localhost(config-route-map)# exit
localhost(config)# route-map Wanguard-Filter-out permit 10
localhost(config-route-map)# set community no-advertise <Wanguard-Filter-community>
localhost(config-route-map)# exit
localhost(config)# write
localhost(config)# exit
To display the bgpd configuration, enter the show running-config command from the “enable” command level. In the following example, the router’s AS number is 1000, and the BGPd AS number is 65000.
The following partial sample output is displayed:
localhost# show running-config
... skipped ...
router bgp 65000
bgp router-id 192.168.1.100
neighbor 192.168.1.1 remote-as 1000
neighbor 192.168.1.1 description divert-from router
neighbor 192.168.1.1 soft-reconfiguration inbound
neighbor 192.168.1.1 route-map Wanguard-Filter-in in
neighbor 192.168.1.1 route-map Wanguard-Filter-out out
!
route-map Wanguard-Filter-in deny 10
!
route-map Wanguard-Filter-out permit 10
set community no-advertise
!
line vty
... skipped ...
Install FRR, then edit /etc/frr/daemons. Change bgpd=no to bgpd=yes and remove the string “-A 127.0.0.1” fromn the bgpd_options line
[root@localhost ~]# yum install frr
[root@localhost ~]# nano /etc/frr/daemons
To be able to start the bgpd service, create a basic configuration file. Setting a password for the bgpd daemon is usually enough to get it started. Replace “bgppass” with your own password.
[root@localhost ~]# echo 'password bgppass' > /etc/frr/bgpd.conf
[root@localhost ~]# echo 'enable password bgppass' >> /etc/frr/bgpd.conf
[root@localhost ~]# chown frr /etc/frr/bgpd.conf
[root@localhost ~]# systemctl enable frr
[root@localhost ~]# systemctl start frr
Connect to the bgp daemon with telnet on localhost port 2605 (default bgpd port) and enter the previously-defined password (“bgppass”) when requested.
[root@localhost ~]# telnet 127.0.0.1 2605
localhost> enable
localhost# config terminal
localhost(config)#
Configure bgpd using the commands shown in the following example after adapting them to your own network. Please note that you can use the prefix-list, route-map, or distribute-list method for filtering outgoing routing information. To have a uniform approach, the following example uses route-maps. Optionally, BGP authentication can be configured to increase security and avoid any illegal BGP announcement which may lead to a security breach.
localhost(config)# router bgp <Wanguard-Filter-AS-number>
localhost(config-router)# bgp router-id <Wanguard-Filter-IP-address>
localhost(config-router)# neighbor <Router-IP-address> remote-as <Router-AS-number>
localhost(config-router)# neighbor <Router-IP-address> description <description>
localhost(config-router)# neighbor <Router-IP-address> password <BGP MD5 password>
localhost(config-router)# neighbor <Router-IP-address> route-map Wanguard-Filter-in in
localhost(config-router)# neighbor <Router-IP-address> route-map Wanguard-Filter-out out
localhost(config-router)# exit
localhost(config)# route-map Wanguard-Filter-in deny 10
localhost(config-route-map)# exit
localhost(config)# route-map Wanguard-Filter-out permit 10
localhost(config-route-map)# set community no-advertise <Wanguard-Filter-community>
localhost(config-route-map)# exit
localhost(config)# write
localhost(config)# exit
To display the bgpd configuration, enter the show running-config command from the “enable” command level. In the following example, the router’s AS number is 1000, and the BGPd AS number is 65000.
The following partial sample output is displayed:
localhost# show running-config
... skipped ...
router bgp 65000
bgp router-id 192.168.1.100
neighbor 192.168.1.1 remote-as 1000
neighbor 192.168.1.1 description divert-from router
neighbor 192.168.1.1 soft-reconfiguration inbound
neighbor 192.168.1.1 route-map Wanguard-Filter-in in
neighbor 192.168.1.1 route-map Wanguard-Filter-out out
!
route-map Wanguard-Filter-in deny 10
!
route-map Wanguard-Filter-out permit 10
set community no-advertise
!
line vty
... skipped ...
Install Quagga, then edit /etc/sysconfig/quagga and replace BGPD_OPTS=”-A 127.0.0.1” with BGPD_OPTS=””.
[root@localhost ~]# yum install quagga
[root@localhost ~]# nano /etc/sysconfig/quagga
To be able to start the bgpd service, create a basic configuration file. Setting a password for the bgpd daemon is usually enough to get it started. Replace “bgppass” with your own password.
[root@localhost ~]# echo 'password bgppass' > /etc/quagga/bgpd.conf
[root@localhost ~]# echo 'enable password bgppass' >> /etc/quagga/bgpd.conf
[root@localhost ~]# chown quagga /etc/quagga/bgpd.conf
[root@localhost ~]# systemctl start bgpd
[root@localhost ~]# systemctl enable bgpd
Connect to the bgp daemon with telnet on localhost port 2605 (default bgpd port) and enter the previously-defined password (“bgppass”) when requested.
[root@localhost ~]# telnet 127.0.0.1 2605
localhost> enable
localhost# config terminal
localhost(config)#
Configure bgpd using the commands shown in the following example after adapting them to your own network. Please note that you can use the prefix-list, route-map, or distribute-list method for filtering outgoing routing information. To have a uniform approach, the following example uses route-maps. Optionally, BGP authentication can be configured to increase security and avoid any illegal BGP announcement which may lead to a security breach.
localhost(config)# router bgp <Wanguard-Filter-AS-number>
localhost(config-router)# bgp router-id <Wanguard-Filter-IP-address>
localhost(config-router)# neighbor <Router-IP-address> remote-as <Router-AS-number>
localhost(config-router)# neighbor <Router-IP-address> description <description>
localhost(config-router)# neighbor <Router-IP-address> password <BGP MD5 password>
localhost(config-router)# neighbor <Router-IP-address> route-map Wanguard-Filter-in in
localhost(config-router)# neighbor <Router-IP-address> route-map Wanguard-Filter-out out
localhost(config-router)# exit
localhost(config)# route-map Wanguard-Filter-in deny 10
localhost(config-route-map)# exit
localhost(config)# route-map Wanguard-Filter-out permit 10
localhost(config-route-map)# set community no-advertise <Wanguard-Filter-community>
localhost(config-route-map)# exit
localhost(config)# write
localhost(config)# exit
To display the bgpd configuration, enter the show running-config command from the “enable” command level. In the following example, the router’s AS number is 1000, and the BGPd AS number is 65000.
The following partial sample output is displayed:
localhost# show running-config
... skipped ...
router bgp 65000
bgp router-id 192.168.1.100
neighbor 192.168.1.1 remote-as 1000
neighbor 192.168.1.1 description divert-from router
neighbor 192.168.1.1 soft-reconfiguration inbound
neighbor 192.168.1.1 route-map Wanguard-Filter-in in
neighbor 192.168.1.1 route-map Wanguard-Filter-out out
!
route-map Wanguard-Filter-in deny 10
!
route-map Wanguard-Filter-out permit 10
set community no-advertise
!
line vty
... skipped ...
Install Quagga, then edit /etc/quagga/daemons and replace bgpd=no with bgpd=yes. Edit /etc/quagga/debian.conf and replace bgpd_options=” –daemon -A 127.0.0.1” with bgpd_options=” – daemon”
[root@localhost ~]# apt-get install quagga
[root@localhost ~]# nano /etc/quagga/daemons
[root@localhost ~]# nano /etc/quagga/debian.conf
To be able to start the bgpd service, create a basic configuration file. Setting a password for the bgpd daemon is usually enough to get it started. Replace “bgppass” with your own password.
[root@localhost ~]# echo 'password bgppass' > /etc/quagga/bgpd.conf
[root@localhost ~]# echo 'enable password bgppass' >> /etc/quagga/bgpd.conf
[root@localhost ~]# chown quagga /etc/quagga/bgpd.conf
[root@localhost ~]# service quagga restart
[root@localhost ~]# service quagga enable
Connect to the bgp daemon with telnet on localhost port 2605 (default bgpd port) and enter the previously-defined password (“bgppass”) when requested.
[root@localhost ~]# telnet 127.0.0.1 2605
localhost> enable
localhost# config terminal
localhost(config)#
Configure bgpd using the commands shown in the following example after adapting them to your own network. Please note that you can use the prefix-list, route-map, or distribute-list method for filtering outgoing routing information. To have a uniform approach, the following example uses route-maps. Optionally, BGP authentication can be configured to increase security and avoid any illegal BGP announcement which may lead to a security breach.
localhost(config)# router bgp <Wanguard-Filter-AS-number>
localhost(config-router)# bgp router-id <Wanguard-Filter-IP-address>
localhost(config-router)# neighbor <Router-IP-address> remote-as <Router-AS-number>
localhost(config-router)# neighbor <Router-IP-address> description <description>
localhost(config-router)# neighbor <Router-IP-address> password <BGP MD5 password>
localhost(config-router)# neighbor <Router-IP-address> route-map Wanguard-Filter-in in
localhost(config-router)# neighbor <Router-IP-address> route-map Wanguard-Filter-out out
localhost(config-router)# exit
localhost(config)# route-map Wanguard-Filter-in deny 10
localhost(config-route-map)# exit
localhost(config)# route-map Wanguard-Filter-out permit 10
localhost(config-route-map)# set community no-advertise <Wanguard-Filter-community>
localhost(config-route-map)# exit
localhost(config)# write
localhost(config)# exit
To display the bgpd configuration, enter the show running-config command from the “enable” command level. In the following example, the router’s AS number is 1000, and the BGPd AS number is 65000.
The following partial sample output is displayed:
localhost# show running-config
... skipped ...
router bgp 65000
bgp router-id 192.168.1.100
neighbor 192.168.1.1 remote-as 1000
neighbor 192.168.1.1 description divert-from router
neighbor 192.168.1.1 soft-reconfiguration inbound
neighbor 192.168.1.1 route-map Wanguard-Filter-in in
neighbor 192.168.1.1 route-map Wanguard-Filter-out out
!
route-map Wanguard-Filter-in deny 10
!
route-map Wanguard-Filter-out permit 10
set community no-advertise
!
line vty
... skipped ...